Friday, June 6, 2008

Unframed

Unframed paper craft
This is a super easy, fast, and cheap craft to do with photos. I was thinking, depending on your market, or your friends, this would make nice "thanks you's" and they really don't cost much. I hit a sale and got the wood for 75¢ and the paper was 25¢ and I only used a quarter of the paper.

You'll need:
a photo (Mine is 5x5)
Square piece of wood 1 inch bigger than your photo all around and as thick as you want it...doesn't really matter)
piece of scrapping paper the same size as your wood
modge podge or craft glue
double sided sticky tape (I use xyron's cheetah which is also excellent for mounting portraits in albums)
sand paper
your finger ;)


1. spread the glue thinly across the whole surface of the wood and then lay your paper on it. Use the edge of a debit card to push out the air bubbles. Use some more glue on the edges if they are peeling back. Let this dry a little bit.

2. apply double stick tape to the back of your photo and place in center of scrap paper

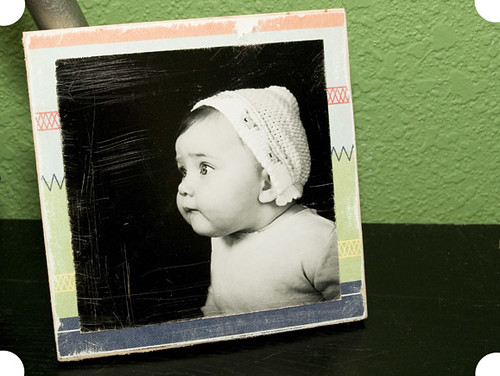
3. Using sandpaper, start scraping the edges of the paper. In a couple of places you might want to sand a little harder to make it look more randomly worn. Also if you want sand the edges of the photo and in different spots of the photo

voila! have fun!

Thursday, April 10, 2008

It's in the background, baby!

Everyday a blank canvas

If you are at all familiar with flickr, you've seen loads of beautiful backgrounds. What you may not know is that these backgrounds can cost next to nothing, even free, because you may already have them around the house.

The background above, though wrinkled and gathered, is a Rachel Ashwell Chabby Chic table cloth I found on clearance at Target. I maybe paid $5 for it. Look around your house for:
blankets and quilts
table cloths
pillow cases (for newborns)
table runners and placemats(also for newborn)
Black towels work great over bean bags
rugs and mats
duvet covers
beach towels
curtains
etc.
and even a long coat:

frugal backgrounds


And don't forget to look for them at thrift stores, yard sales, grandma's attic, remmnant bins, fabric sites and clearance shelves to save a little bit more. You can hang these improvised backdrops over kitchen chairs, clotheslines, doors, and even clip them to window frames.

Wednesday, April 9, 2008

The Elusive Tutu

easy and cheap  tutu on frugal fotog

Many children's photographers love having tutu's in their props for those darling little princesses we come across. The problem often is the hefty price tag one has to pay to get one. What if I told you the tutu above cost me $3.25!?

I bought 3 yards of shiny sparkly material for $3 and elastic at Walmart. I folded the fabric in half lengthwise twice and sewed straight down the second folded edge about an inch from the edge....IF YOU DONT KNOW HOW TO SEW, you could get a seamstress to do this for you for as little as a couple bucks. Cut about 2 feet of 1/2 inch elastic and thread it through the one inch casing you created. Sew the edges of elatic together. I didn't sew the back edges of the fabric together. I want to be able to easily adjust the elsatic for different size girls. I will do this by simply pulling on the elastic and tying a knot. This skirt will fit my 3 year old and my 12 year old.

If you can't find a good dollar fabric at walmart, sign up for coupons and ads at your local fabric stores to get great deals on formal style fabrics. You could still be paying only as much as $15 per tutu which is a great savings compared to some tutus $30-80 price tags.

For variations you could
-use 2 different colors of fabric
-embellish the bottom with ribbon
-put silk flowers into the larger "pocket" and sew up the sides
-add a cluster of vintage looking flowers to one side
-wear 2 tutus for even more height


let me know if you have any questions...have fun

Monday, March 31, 2008

Vista Prints

Marketing Material from vistaprints

I love www.vistaprints.com !!! They are constantly sending me emails for sales and freebies. Thanks to all of these sales, I've been able to pull my marketing material together for almost nothing. (nothing being an image upload charge and s&h.)

The picture above shows the following products :notecards to send to clients to thank them for booking me or thank them for their order, brochures for boutique proposals, large postcards for info packets, small postcards for mailing, and handing out, business cards (in glossy!) stamps to stamp my website and one for gallery address and passwords, and rack cards w/pricing.

I don't know how they make any money. I'm sure they take a cut from the S&H and the 4.99 upload charge. Plus there are those times I just have to have something whether or not it is on sale.

I recommend using the 7 day shipping option. It usually arrives in only a handful of days and is only a few dollars more. Also instead of uploading a text backside for postcards (and paying an extra 4.99), consider using their tools to type the info in. Oh and get glossy on those premium business cards. I forgot to do so with my last batch and can tell the difference bigtime.

Friday, March 7, 2008

New definition for "road rage"

van/camper/studio

My flickr friend Leya recently made a post in one of our groups about using your car as a mobile stuidio. It was a bit tongue in cheek but the truth is we know it works and we love it! You can see Leya's set up here

Now whether it's that you haven't learned to use studio lights, don't have them, or just prefer outdoor light, here are some other places to get out of the sun while still getting that nice daylight look:

Parking garage
on the front or back porch
in the garage
Under an umbrella
under a blanket
under a table or other furniture
under a pier, bridge or overpass
in a doorway

have fun!

Make your own flash diffuser

frugal fotog

Now really diffusers don't cost too much. A Gary Fong Lightsphere will cost you about $40. But we have other things we want/need to spend $40 on. Well you're in luck! There are plenty of tutorials out there if you're up to making one yourself. And depending on how innovative you are, you could score one for free.

I thought I might need one for an indoor session I have tomorrow. I looked around in the cupboards and found a rubbermaid squarish drink conatainer that had been missing it's lid for some odd years. I carefully cut away the bottle mouth and then traced my flash over the reminaing hole. Then cut away again carefully until my flash could be slid in snug. Here's my flash bounced off the ceiling with no diffuser and then using the difusser at the same settings, both sooc.

P3068193 P3068194

other flash fun:
Homemade softbox
And what about making one for your pop up built in flash out of a claer film canister (if you still have one around?)

Welcome! A bit about me and the Frugal Fotog blog

My name is Monique Duke. I've been in business for 2 years and been a photographer and artist my whole life. Part of being an artist is exploring and playing. You learn how to do things yourself, which is why a lot of new indie crafters refer to themselves as DIYers. Because of my background, I feel that I've been able to bend the rules a bit when it comes to my business. I'm pretty good at discovering tricks and doing things for myself. Though a lot of professional photographers advise that you should hire other people to do things for you (logo design for example) it's not always in the budget...especially if you're saving up for the D3 like I am ;)

Let me know if you have any post ideas/tips and if you're looking for help PLEASE let me know in the comments. Stay tuned a little diy project is coming up tonight!